
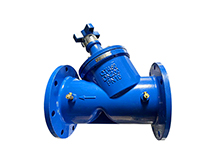
- Gate valve
-
- DN1000 Extension stem double flange soft seal gate valveDIN F4 resilient seated gate valveDN450-1200 Resilient Seated Gate ValveDIN F5 resilient seated gate valveSocket connection soft seal gate valveUnderground cap soft seal gate valveBS5163 rising stem soft seal gate valveHard seal gate valveAPI slab Gate ValveStainless steel flange gate valveWafer knife gate valvePneumatic gate valveSoft seal gate valveExtension stem gate valveUL/FM fire protection groove ends gate valveRising stem forged steel gate valvecarbon steel gate valveStainless steel threaded gate valveDIN soft seal gate valveANSI soft sealing gate valve 200PSICast iron gate valveBS resilient seated gate valve
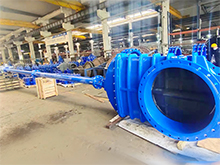
- Butterfly valve
-
- DN900 pneumatic triple eccentric hard seal butterfly valveD643H Triple Eccentric Butterfly ValveD343H Hard seal butterfly valveMulti standard EPDM seated butterfly valveSingle flange butterfly valveDN2000 Double eccentric butterfly valveFlange butterfly valveLug butterfly valveWafer butterfly valve with handleWorm gear operated butterfly valveWafer lined fluorine butterfly valveStainless steel wafer butterfly valveStainless steel flanged butterfly valveThree eccentric flange butterfly valvePneumatic flanged butterfly valvePneumatic wafer butterfly valveTriple eccentric butterfly valve wafer typeWafer butterfly valve ULC approvedInflatable seat butterfly valveHigh performance butterfly valveGrooved end butterfly valveElectric soft seal butterfly valveFlange fluorine lined butterfly valveHandle aluminum butterfly valveWorm Gear Aluminum Butterfly ValveFull PTFE lined butterfly valve wafer typeOne stem no-pin wafer butterfly valveMulti standard aluminum stem butterfly valveStainless Steel wafer Butterfly ValveAluminium handle operated lug butterfly valveLever Operated Flange Butterfly ValveButterfly valve stemButterfly valve discButterfly valve seat
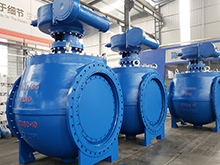
- Ball valve
-
- DN1400 top-mounted eccentric semi-ball valveFlanged three-way ball valveFully welded ball valveNatural gas ball valveHigh platform flange ball valve1 PC ball valveFixed ball valvePTFE seat flanged ball valveMetal seat ball valveAPI 6D ball valve3 Piece ball valveFull Bore 3 way ball valve L-Port3 Way T-Port ball valve2PC Ball valve female thread stainless steel
- Globe Valve
-
- API Carbon Steel Globe ValveBellows Globe ValveStainless steel flange globe valveStainless steel thread S type globe valveStainless steel thread B type globe valveCast Steel Globe ValvePiston Globe ValveWCB Carbon Steel Globe Check Valveelectric motorized control stainless steel SS316 globe valveBrass Globe ValveCryogenic Globe valveHT200 Globe ValveThreaded Stainless Steel Globe ValveGG25 Globe ValveANSI API Cast Steel And Stainless Steel Globe valve
- Check valve
-
- Rubber seal check valveDN800 Slow closing check valveDN800 Rubber Disc Check ValveButterfly Buffering Check Valvecheck valve with counter weightSilent Check ValveWCB Swing check valveSwing Check ValveSingle Chip Check Valve H74WStainless Steel Wafer Check ValveSwing Start Check ValveFoot check valveAPI Swing Check ValveDIN Flange check valveSingle plate check valveLifting Check ValveBottom ValveHammer Diminish Noises Check ValveWafer Check ValveWafer dual plate check valve
- Control valve
-
- Static Balancing ValveCage Guided Sleeve Globe Control ValveDN1000 Piston Flow Regulating ValveDN1600 Electric Actuator Flow Regulating ValvePneumatic Flanged Butterfly ValvePneumatic Wafer Butterfly ValveAngle Seat ValvePneumatic gate valveElectric three-way control valveElectric sleeve control valve
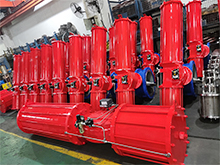
- Water Meter
-
- Vertical Type Water MetersStainless steel threaded water meterPiston water meterPlastic water meterMore flow rotor dry water meterspiral vane flange water meterCI wotlman water meter with pulse outputLXCLG(R) Vertical removable element woltman cold (hot) water meterSingle flow rotor dry water meterPrepaid Token Water MeterElectromagnetic flowmeterRotary Piston Liquid Sealed Water MeterRotary Piston Liquid Sealed Water Meter
- Air valve
-
- Double ball exhaust valveDoubleair Air Valve SaudiDoubleair Air Valve Southeast AsiaDoubleair Air Valve South AmericaDouble Air ValveThreaded Air ValveSingle Air ValveTriple Functions Air ValveAutomatic Air Release ValveAutomatic release valveAutomatic exhaust valveComposite Exhaust Air ValveBrass exhaust valveDouble Ball Air Valve
- Pipe Repair & Coupling
-
- Flexible Multi-Function Pipe Coupling ZFJ-SSS Semi-Circle Pipe Repair Clamp SJW-HDuctile Iron Band Repair ClampStainless Steel Band Repair ClampDouble-Section Pipe Repair CouplingFolding Type Pipe RepairSingle-Section Multi-Function Pipe Coupling MF-SGear-Ring Type Multi-Function Pipe Coupling GR-SZBW Damping Corrugated Hose
- Dismantling Joint
-
- VSSJAFC(CC2F) Detachable Flange Transmission JointVSSJA-2(B2F) Double Flange Limited Expansion JointVSSJA-1(BF) Single Flange Limited Expansion JointVSSJA(AF) Flange Loose Expansion JointJGD-B Threaded Rubber JointZBW Damping Corrugated HoseKXT-S Flexible Dual-Spherical Rubber JointKXT Rubber Soft JointFlange Adaptor
Precautions for gate valve operation
1. Preparation work
① According to the valve specifications required to select a good wrench, screw, hacking bar, force bar, top wire, and other tools.
② Prepare the appropriate amount of cotton yarn, detergent, valve end gasket, packing, lubricant, etc. according to the valve specifications.
2. Operation steps
① operate the valve to the fully open position.
② cut off the gate valve before and after the control valve, emptying the remaining medium in the pipe.
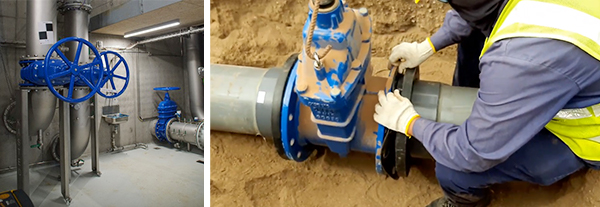
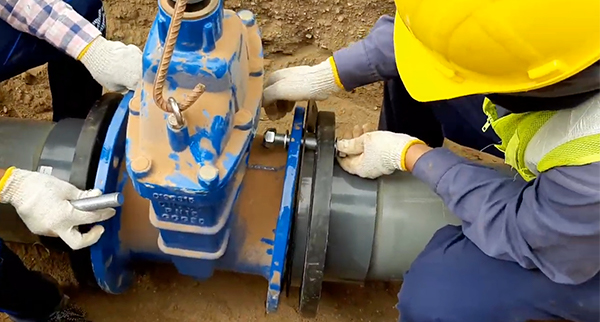
③ use a wrench to disassemble the flange bolts connecting the gate valve to the pipe, use a sling to attach the appropriate part of the gate valve and lift the gate valve with suitable lifting equipment.
④Disassemble the flange, check and clean the valve cavity, gate plate, stem head, flange gasket, etc.
⑤ The damaged flange gasket should be replaced, and a layer of grease should be applied to both sides of the gasket before installation.
⑥After cleaning, the stem is set into the gate, the gate guide groove and the valve body guide bar alignment, installed into the valve body, turning the hand wheel, so that the two flanges close together right, installed into the bolt, diagonal fastening nut.
⑦Commissioning is completed, according to the valve corresponding test procedures for pressure testing.
3. Technical requirements
① disassembly, collision gate, and seat sealing surface are strictly prohibited, and pay attention to the direction of the installation surface of the gate, which can be marked before disassembly.
②All parts should be thoroughly cleaned.
③Each part should be installed as far as possible according to the original state, and adjusted to a reasonable position.
Replace flange gasket:
1. Preparation
①Materials: grease, cotton yarn, leak detection fluid, sealing gasket.
②Tools: wrench, screw spinner.
2. Operation steps
①Remove the flange connection bolts, remove the valve or remove the leaking end pipe section. Clear the used gasket on the sealing surface.
②Select a suitable gasket and apply a layer of grease evenly on both sides.
③ Gasket on the sealing surface between the two flanges, align the center of the two flanges and the center of the bolt hole, install the bolt, screw on the nut, and tighten the nut diagonally with the uniform force several times. The bolt should extend the length of the nut by 2 to 3 pitches. After the flange gasket is installed, it should be qualified by doing a working pressure test without leakage.
3. Technical requirements
①The flange should be operated carefully to prevent damage to the flange.
②After completion, the tool should be cleaned and maintained.
4. Five points of gasket installation
①Choose the right flange, bolt, gasket form, material, and size should be appropriate according to the operating conditions and flange surface structure form matching.
②Check carefully: The quality of the flange, bolt, nut, and gasket should be checked carefully before installation, and there should be no burr, unevenness, crack, or other defects. Carefully check the flange, and pipe installation, there should be no off-center, wrong mouth, wrong hole, and other phenomena.
③ clean: flange sealing surface must be clean, bolts, gaskets shall not be stuck with impurities, oil, etc.
④Fitted: gasket should be concentric with the pipe or pipe fittings.
⑤ evenly: the installation of bolts and nuts should be evenly applied, and tightened symmetrically several times.